Search This Blog

Thursday 31 October 2013

DIY last minute Halloween decor

Happy Halloween, gentle readers!
I enjoy this holiday for all the dress up fun and whimsy it has to offer.  Plus, lets be honest, this might be the only time of year you get to see all your neighbors in one evening.

But what about those of us who feel like the holiday tip toed up on them? Who woke up this morning and thought "Oh yeah! That Halloween thing happens today!".   To those I say, fret not! I have a very inexpensive 20 second exterior home decorating idea that will trick everyone into thinking you were on top of things!

Here is how to make spooky glowing eyes!

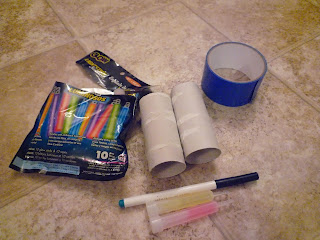
First gather:
supplies


toilet paper tubes (people, these tubes are NOT garbage! save at least a grocery bag full for all your impromptu crafting needs!)
Scissors or craft knife
Duct tape
Glow sticks
Marker

With your marker draw the shape and position of your eyes
Yes, they are not perfectly shaped. But I promise it wont matter
Using your craft knife cut out the eye holes.
Don't judge me on my cutting skills, please
Crack and shake your glow stick to activate it.  Then put the glow stick inside the tube.
she glows!
Seal the ends with duct tape.  Sealing the ends allows the light coming though the eye holes to be more concentrated.  It also allows people to believe the eyes belong to some spooky being hiding in your bush because the magic isn't ruined by light seeping from either side of an open tube.

Won't matter that my duct tape is blue, honest
Place in your trees, bushes or shrubs.

They see you!!


 Enjoy this fun and festive day, gentle readers!


Monday 28 October 2013

Last minute DIY (modest) Halloween costumes

*Deep breath* LastweekIturned30.  phew, yup, I said it - last Tuesday I turned 30. Then this past Saturday we attended a friends Halloween party. Although only days separated me from 29 and 30 I suddenly felt silly in those pop up Halloween costume shops looking at the tiny dresses made to be costumes for 19 year olds.  And they might be adorable on a tiny 19 year old, in fact I sometimes wish I had worn these costumes when I was, in fact, a very fit 19 year old.  But now I am 30 and have had two kids, mix in struggling with my own personal body image,  and I feel the furthest thing from comfortable in something called a "sexy peacock" costume.  And paying $90 to wear a costume I am not comfortable in? Not a chance!

Yet a costume at the Halloween party is absolutely mandatory. So, of course, I decided to DIY one that would fit inside my budget and comfort level when it came to modesty.

I went as a sailor.

I pulled out a knee length navy skirt and a white tshirt I had
I used white, red and blue duct tape I had left over from making this costume for my son.
That Guy, with permission, took home a coffee filter for me. And I borrowed a headband from my daughter and my sons red marker.   My only real cost here was $4.50 for three packages of brass buttons.

supplies for sailor costume
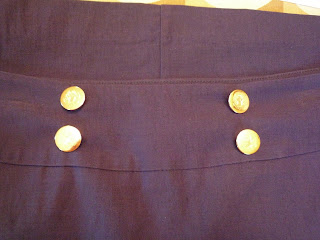
 First I put my skirt on and marked with chalk where I wanted my brass buttons.
marked in chalk
 I hand stitched the brass buttons in place
brass buttons in place
The tshirt was a crew neck.  If I had a boat neck shirt I would have used that but I didn't.  Also crew necks are not the most flattering on me which is why this shirt had never been worn.  I was hoping that drawing a v neck onto the shirt might be just the thing.  So using one of my sons washable markers (since I will not be wearing this costume next year the marker being washable was totally fine) I drew in a v neck and coloured what I hoped were nautical stripes.
nautical stripes?
Using duct tape That Guy taped along my "v" for me and made the neckerchief design on the back of the shirt.   We also added blue duct tape stripes to my sleeves and two white duct tape stripes to the bottom hem of my skirt
That Guy is such a great help!

 Next I tool a length of Bristol board cut into a strip and used duct tape to secure it into a circle. Any cardboard could work here though.  Also, for the record I think I got the height here wrong.  All night I was being asked if I was a flight attendant, but I think if I had cut the strip of Bristol board thinner it would have looked more "sailor-ish".
taped into a circle
 Then, using the coffee filter, I made the inside for the hat.  Again, I think this would have been more successful if I had cut my cardboard thinner.
coffee filter hat- inexpensive and stylish
 Using more duct tape and another brass button I finished off my "hat".  Upon reflection I think I would have been more successful in the sailor vibe if I had put an anchor rather than a bow on the hat.  But I love bows so I did it my way. :)
who doesnt love a bow?
 I used some more duct tape to attach my coffee filter hat to a head band borrowed from my daughter.  As you will see in the photo below, I also decided that the crew neck just did not work on my frame and decided to cut a small v neck into the shirt myself.
$4.50 costume 
 That Guy also had to find something quick and in expensive to wear for this party.  He went as Wolverine. He used his own leather jacket, shoes and jeans.  He sacrificed one of his white t shirts to rip up and add faux blood too.  The claws were a $10 purchase and he used a can of spray in black hair paint for $2.
Woverine/ That Guy
We ended up with a total cost of under $17 for two adult Halloween costumes.  Not too shabby in my books!

Thursday 24 October 2013

DIY New Baby Gift- Baby Sundae

Yet another sweet baby has made her appearance in the family of some friends of ours. This baby sundae is part of a gift for her.

I make variants of these sweets themed baby gifts. Everything from sundaes to lollipops, peppermints, candy apples and salt water taffy.  I do not usually do the cupcakes simply because I see them everywhere. I am able to sell many of these gifts and as such often buy the baby items whenever I see something good quality for a decent price.  So as it worked out for this I had all materials on hand.

What you need for the baby sundae:

-plastic feeding bowl with lid- I usually buy mine 5 for $1 at the dollar store
-plastic feeding spoon - 10 for $1 at the dollar store
-two baby washcloths - with careful shopping I am usually able to find these for roughly 50 cents each
-one newborn diaper- I use newborn size for two reasons 1. That is usually the size new parents need, 2.                 They are often the only sized diapers that have a white exterior without being covered in licensed                    characters which would ruin the look of the sundae.
-one red pom pom

First I start by taping the lid right to the bottom of the bowl.
lid taped to bottom
Next I take my first baby washcloth and open it up.
Washcloth open
Then I fold it almost in half leaving about 1 inch exposed.  I fold this way because I have found this fits best into the bowls I have.  If you find your washcloths don't fit as you would like into your bowls you can likely just refold to solve the problem.
Folded almost in half
 Then I fold the bottom edge up
edge up!
 Then I folded in half again .
in half again
 Just tuck the washcloth into the bowl.   Repeat the process with your second washcloth and tuck that one inside the first one.
tuck the washcloth into the bowl
 Onto the diaper! Open your diaper up...
Opened diaper
Then fold in half lengthwise

Folded in half
 Starting at the back end of the diaper (the side that would be on the baby's back, not her tummy when she is wearing it) roll the diaper.
roll up the diaper
 If you rolled from the front side of the diaper instead of the back the top of this roll will have the brand logo on it- not desirable for our purposes.
diaper roll up
 Take your diaper roll up and place it in the bowl in the center of your two washcloths.
diaper in the center of the washcloths
 You may notice that your sundae looks a little... sad at this point.  We can fix that! Just give a little tug here and there to fluff  things up and it will look much better
ahh, much better
 Finally take a red pom pom and place it on the tip of the rolled diaper.  I do not use anything to keep the pom pom in place- I am just sure not to do cartwheels while delivering the gift and it has always been fine. Add a brightly coloured plastic spoon. Taa-daa!!
adorable
I usually like to package mine in a small cellophane bag tied with a length of ribbon.


Monday 21 October 2013

DIY new baby gift- The Gift of Sleep (well, not really)

DIY new baby gift- The Gift of Sleep (well, not really)

Many people have baby showers for the first baby. The new parents are often gifted many of the items that will make life with a new baby easier.
Baby number two is often not celebrated in the same way.  I was very fortunate that a friend hosted a celebratory tea party to mark Audrey's arrival.  I am a believer that every baby should be celebrated in some way, not just the first one.
By the time baby three or more arrive, although there is MUCH joy there is often very little celebration.

Friends of ours just had their third baby. All three of their children are boys. They were very clear that they did not need or want anymore stuff for a baby boy.  As much as I totally understood what they meant (how many onesies can one baby really wear?) I still very much wanted to gift them something as a small way to celebrate this tiny guy.   But what??!!

They had already been given a few months of a cleaning service to help out with the chaos of a new baby. Although I liked the idea of making up a few freezer meals so they didn't have to worry about cooking dinner for a few days, we all know I cannot cook and I didn't want to load another task onto That Guy's shoulders.  I thought on this for days. When asking myself  "What do parents of three boys really want?" the answer "sleep!!!" kept coming back to me.  But how could I give them sleep? I couldn't.   Then the old incandescent light bulb went on on over my head. I couldn't give them more  sleep,  but what if I could help them to get better sleep? Through lavender!

So I came up with this gift set.

Pretty, right?
Now, I will be honest with you, gentle readers.  I almost didn't make this gift set.  Not because I didn't like the concept - I loved my idea- but because the cost was going to be higher than the $8 cap I typically put on my DIY gifts.  I ended up paying a total of $9.25 for this gift, but that is after I sourced out as many "free" items as I could.

This gift set includes a lavender linen spray, two rosemary lavender Tub Tea bags and a lavender beeswax candle. 
To make this gift you will need:
 - a gift box    $1 at the dollar store
- spray bottle   $1 at the dollar store
- a pretty faux lavender stem (optional, just for decoration in the gift box)  $1 at the dollar store
- butchers twine or kitchen string (used for candle wick and to tie on tags) obtained for free by asking on a social networking site if anyone had some they could spare
- distilled water - on hand
- 1/4 cup vodka    most people would have this on hand, but we are not vodka drinkers. So another friend gave me a 1/4 cup.  I have nice friends :)
- lavender essential oil  - on hand   This stuff is sort of expensive to buy initially, but it really is worth it. I have also found that the best prices on oils like these are at local farmers markets. 
- 1/4m muslin from the fabric store - $2.25 after my card holders discount
- dried rosemary - $2 from local grocery store
- 1/2c dried lavender buds - just under $2 from the local health foods store
- mason jar - on hand
- metal washer - on hand
- fresh, local beeswax - given to me for free from a very nice gentleman who knows I love to DIY
- purple tissue paper- on hand
- roll of cellophane - on hand but can be found for $1 at the dollar store
- baking soda - on hand
- Epsom salts - on hand
  
Phew!! That is quite a list!!!

I started with the easiest of the three gift items- the linen spray. I have made linen spray many times before and we really enjoy the soothing sleepy effects of the lavender on our sheets and pillowcases.  
For whatever reason my camera is telling me I do not have photos of this process (even though I am certain I took them).  It really is very simple to make so hopefully you can get by without photos. 
The spray bottle I bought from the dollar store held a 3c capacity.  So in the bottle I put 1 tsp lavender essential oils, 1/4 cup of vodka and filled the rest of the bottle with distilled water.  Put the spray top back on the bottle, shake it up and you're done!! I added a pretty little label to the front of my bottle too.  See? Easy peasy, lemon squeezy!

Next came the Tub Tea. I had seen these at craft shows in the past and loved the idea.  They are lovely tub soaks contained within an over sized "tea bag" so that lavender buds are not floating around your bath water. I always thought I could make them myself and I am happy I finally did.  

I cut my muslin into approx 4x4inch squares.  The 1/4 m of muslin I bought would be enough to make a little shy of a dozen Tub Tea bags.  But I only wanted to make two. With a quick stitch on the sewing machine I sewed shut three of four sides of the bags.  

In a  container I mixed
1 cup baking soda
1/2 cup Epsom salts
1/2 cup dried lavender buds 
1/4 cup dried rosemary

Mix it all together. 

all mixed
Then spoon your mixture into the muslin bags. Fill about 3/4 full.  Run a quick stitch down the open end of the bag to close it up.

sewn shut
 I added a little tag to mine and tied them together with my twine. 
done and done
Finally the candle.  I have never ever attempted to make a candle before. I took a length of twine and tied it to the metal washer.  I melted a small amount of beeswax and dripped it into the bottom of the mason jar then pressed the washer into the wax.  The other end of the twine I tied around a pencil and rested the pencil across the mouth of the jar to hold the wick straight.
The candle wick in place
Then I melted the beeswax.  I decided to do this on the stove in a makeshift double boiler.  When the wax was melted I added 20 drops of lavender oil to the wax and mixed it with a spoon.
Wax all melted
 I thought I had melted enough wax to fill the jar but I quickly found out I was mistaken.  I was advised by a friend that one of the best ways to ensure long lasting scent is to add a few drops of oil to the wax every few inches as you pour it into the jar.  I trust said friend so I did exactly that.
half full
 I melted some more beeswax so I would have enough to fill the jar right to the top.  I imagine my candle turned out the way it did because I did it in two batches.  What ended up happening was a crack along the top of the wax.
crack in the wax
 In my infinite wisdom I decided to melt a bit more wax and spoon it into the crack to fill it in.  *sigh* The result was a pretty candle from the top, but a very ugly one from the side.  The cooled wax in the jar must separate from the glass ever so slightly.  Because that newly melted and spooned wax did fill the cracks and ran in tiny wax rivers down the inside of the jar.  The people I made the gift set for are good hearted people and will appreciate the spirit of the gift and will  over look the ugly candle, I am sure.
Lesson learned for next time though.

Then I put everything into the gift box and tied the cellophane shut with some ribbon.
This entire gift took me 70 minutes from start to finish and I really love the results.  Hope you do too, gentle  readers!


Tuesday 15 October 2013

DIY Halloween wreath

My son Walter is getting pretty excited about Halloween. He even convinced his Nana and Papa to allow him to decorate their house for the occasion. When he came home after that there was no getting around decorating here too, he was too pumped!

However, many of our Halloween decorations seem to have been lost- which I imagine happened when we moved back in January. But of course I did not notice until now.  So off to the dollar store we went.  We picked up some spider webs and plastic crows. Walter really wanted to hang some plastic skeletons too. So we ended up buying four plastic skeletons.  All the excitement of the day must have taken its toll on the little guy (he is still four...) because by the time we got home with our "loot" he hung one skeleton and declared the house sufficiently decorated.

Slightly annoyed by his willingness to waste I was determined to make use of our decorations.  So That Guy went outside and strung the webs, positioned the crows and hung one skeleton on the front porch. But how many plastic skeletons does one house really need? Especially one house that is also a home daycare - in other words I am totally open to the whimsy of the holiday but I am not looking to frighten small children.


So I decided to make a wreath for our front door out of the remaining two  skeletons. Since they were $2 each this project came to a cost of $4.

One of the dollar store skeletons. 
 I was able to very easily pull apart the skeletons by hand.
disassembled skeletons
 Then That Guy cut the nubs off the bones with an Xacto knife.  The cake box is there to protect my floor from the knife. I was on the floor because.... well frankly I prefer to craft on the floor. Enough with the questions! ;)
Bye bye nubs
 Then I dry fit all the pieces together. Since the skulls already had plastic loops with strings for hanging in them I kept one in tact for the top of the wreath for easy hanging.  I asked That Guy to cut off the plastic loop from the other
Dry fit your wreath first

Next, with my trusty hot glue gun I glued all the bits together. 
GLUE!

 Then I hung it on our door!
Taa-daa!
The whole process, start to finish, took about 6 minutes with the majority of that time spent waiting for the hot glue gun to heat up.  Enjoy, gentle readers!

Friday 4 October 2013

DIY anniversary gift for him


My seventh wedding anniversary was on Monday. That Guy and I have always done traditional gifts, so this year was copper.

One day while tidying up I can run across some costume dog tags that had been used one year as part of a Halloween costume. Something about them just stayed with me.. Then when I was trying to think of something copper to make for our anniversary those dog tags came back to mind.

I thought I could buy some copper dog tag blanks and metal stamp them.  That Guy wouldn't wear them around his neck, but if I put them on a key ring it would be an adorable key chain. I use "adorable" with as much masculinity as is possible.

First, to get a metal stamp kit.   I could buy one (hahahaha!!) or I could borrow one. So I phoned my aunt who has a very masculine and handy husband and asked if my uncle had a set of metal stamps.  He did, but only the numbers.  I figured I would need letters too.  I posted to a social networking site asking friends if I could borrow a set.  Nothing solid came back.  But then my aunt called back.  She said her neighbors boyfriend had a complete set I could borrow.  Hooray!!

Then I did some thinking about what to stamp.  I was really lacking for ideas so I went online and looked up the venue we had been married at.  My search engine returned a bunch of hits, but I noticed one had the geographical co ordinates for our venue.  That was it! That was perfect! I would metal stamp those co ordinates into the copper.  I copied down the co ordinates and kept them safely tucked away.

I placed an order online for some copper key chain blanks. Yes, blanks- with an s. Since this was my first attempt ever in my life at metal stamping I knew I would mess up a few times first. I ordered five for a total cost, including tax and international shipping of $16.42. (VERY expensive for my taste, but what can I say, That Guy is worth it)  Advice: sellers online do not post measurements of their items for the fun of it.  Do not ignore the measurements thinking that it "looks" like it will be the right size..... because sometimes things show up and they are much, much smaller than you had anticipated.... just saying this *may* have happened to someone here....
So very, very tiny!!!
Finally, 17 days after my order was shipped I received it. (missing our anniversary date.  Which is why this post is happening today and not this past Monday when our anniversary was)

Let me just say thank goodness I got five blanks!!! As it turns out metal stamping takes a bit for forethought and planning than I had expected.

After totally ruining my first two blanks I learned a valuable lesson.  Use double sided puffy tape! This is something I have all the time in craft supplies but its very easy to find in the craft aisle of any dollar store.  Take a length of double sided tape and adhere it to your work surface.  Peel the backing from the side facing up and lightly push your blank onto the tape.  The most important thing this does is keep that piece of metal from sliding around.  Its hard enough to get letters straight without worrying about sliding.
The other thing the puffy double sided tape does is provide a small cushion when stamping. Using metal stamps involves a bit of hammering and I found there was a big difference in the clarity of number and letters when stamped on the cushioned tape instead of on my hard work surface.

Use double sided puffy tape!
Because my blanks were SO much smaller than I was expecting I ended up having to use two.  On one side of the first blank I stamped the longitude. To make the degree symbol I actually hammered one of That Guys round metal piping tips into the copper.  I imagine he will be very unimpressed when he goes to use that tip to decorate a cake (hopefully I can replace it before then) but it worked really well.  One the back of the first blank I stamped the latitude.  Then on  a second blank I stamped "7 years ago"
all stamped up

I added a key ring (I took one from my own key chain since I didnt have any on hand) and Volia!


Taa-daa!